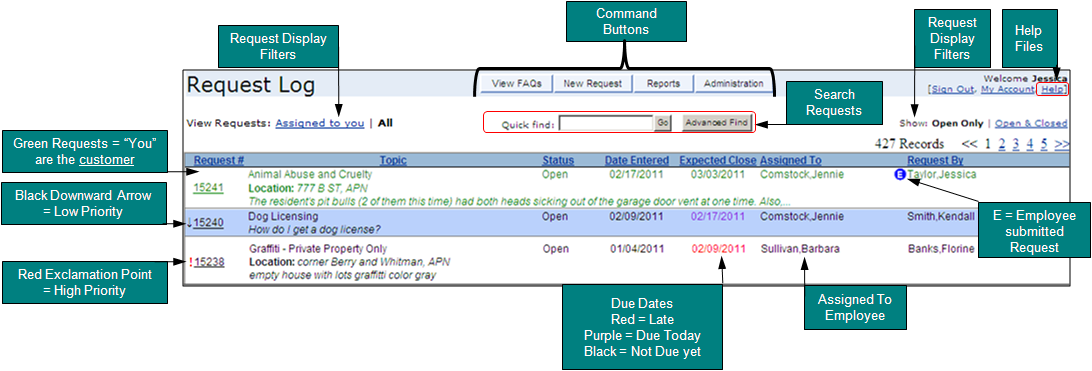
Figure 3 - Request Log
Once you sign-in to the system, the first screen displayed is the Request Log. The Request Log is like the Control Panel of your account to access requests, create new requests, view & create new reports and view FAQs (See Figure 3).
Figure 3 - Request Log
In Figure 3, the list of requests displays requests Opened and "Assigned to You". Sort through the requests by clicking on any of the headings: Request #, Topic, Status, Date Entered etc... to display the heading in ascending or descending order.
Under the Expected Close Date heading, two dates appear in RED. These dates mean the request is overdue. Dates that appear in Violet (not shown in Figure 3) mean the request should be closed today. To see detailed information about a request and/or to edit the request, click on the request number.
When you first sign into the system the request log display filters will default to Assigned to you and Open Only requests.
Figure 3 has several other features and command buttons. Below is a brief description of each item.
Command Buttons:To change your account information, such as your last name, phone number or password, select the My Account link, located on the Request Log Screen (Figure 3). To view the My Account screen, see Figure 4.
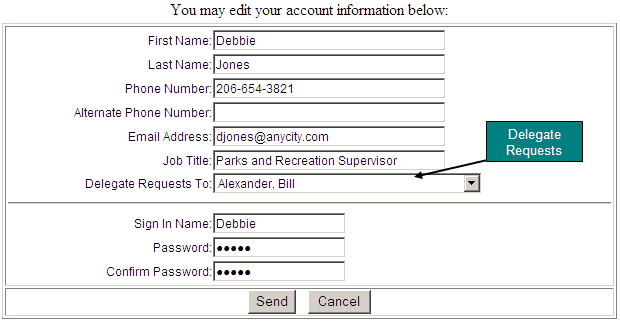
Figure 4 - My Account Screen
The My Account link allows you to Delegate Requests to another employee when you are absent from work. The employee you delegate requests to will receive all requests assigned to you in their Request Log and receive all email notifications associated with your requests.
To delegate your requests, view the My Account link and simply select the appropriate employee from the field called “Delegate Requests to” and hit Send (See Figure 4). The screen will return to the Request Log and a message will appear at the top of the screen, “You have delegated your requests to [employee’s name] (See Figure 5). The employee you are delegating requests to will see a similar message on their Request Log screen. For example, “Jessica Taylor has delegated requests to you.”
Note: If you are delegating to an employee who is already in delegate mode, your requests will be forwarded to the next employee receiving requests. For example, if you chose to delegate your requests to Sandra, and Sandra is already delegating to Pam, your requests will automatically be forwarded to Pam.
To unset this option, view the My Account link and select the delegate menu. Set it to "No Delegation". Select "Send" and your account will no longer delegate your requests.
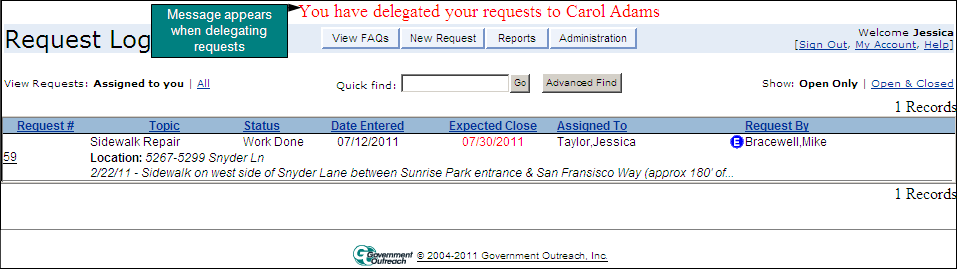
Figure 5 Delegate Mode
The Quick Find and Advanced Find tools are useful search features to find requests in the system quickly. These tools are located on the Request Log.
Quick Find
The Quick Find will search by the address location, the request number, the customer’s last name or key words in the request description. (Note: Typing only the beginning letters of the last name are necessary for the system to perform a search. For example, typing in the letters ‘car’ will return names such as Carson, Carey, or Carter. McCarthy will also display as a possible match).
Advanced Find
The Advanced Find tool is a more powerful way to search for requests. More search fields are available such as the Entered By employee, the Topic, Close Date, Customer Address phone number, and department.
To operate the advanced find feature, select the Advanced Find button in the Request Log view (See Figure 3). This will display a dialog box (See Figure 6). To begin selecting search criteria, select a field from the “Choose Field” column. This will display and activate choices to search on the right (See Figure 7).
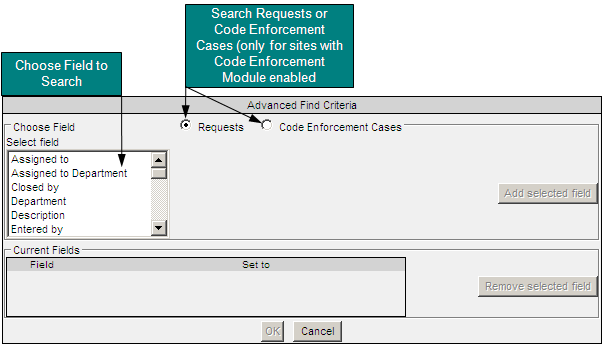
Figure 6 - Advanced Find
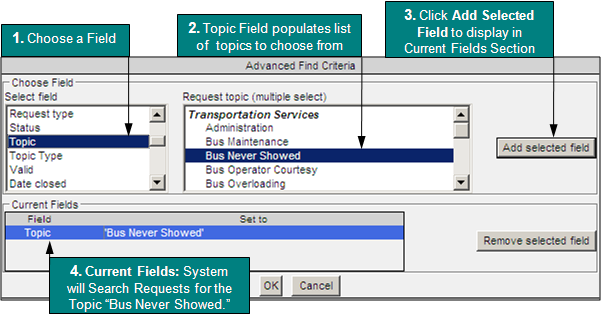
Figure 7 - Advanced Find

Figure 7, sets the search criteria for one field. First, select the “Topic” field (from the “Choose Field” column on the left)(step 1). This will populate a list of Topics on the right (step 2). In this case, “Bus Never Showed” was selected for the Topic. (Note: To select multiple topics at once, hold down the CTRL key). After selecting topic(s), click the “Add selected field” at the right (step 3), to add this field to the search box. Your search criteria will appear in the Current Fields Section (step 4).
Click OK at the bottom to view your search results. (Note: The system will only return requests you have permissions to access).
Figures 8 & 9 show a search across two fields that will find requests that are “Assigned to You” and requests entered in the system “Last Week.”
In Figure 8 the “date” field will display a pick list of dates to choose from. The dates are parameters so that you can reuse the date values in the drop down menu again. For example, selecting the date parameter “Yesterday”, will always return results for the day before today. Inputting actual dates are not necessary (i.e. 10/20/2009).
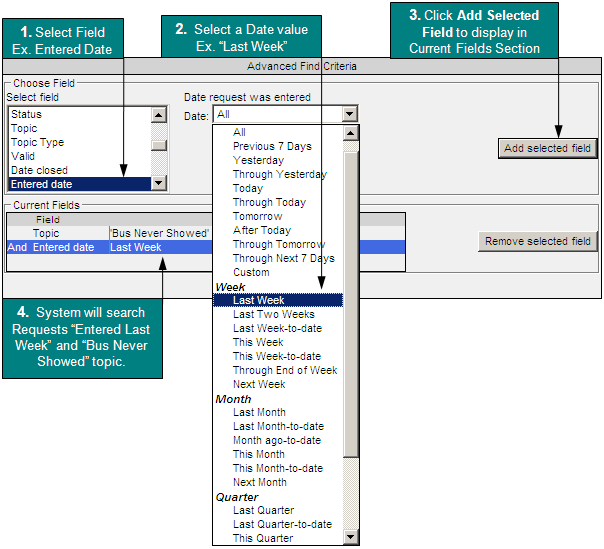
Figure 8 - Selecting Two Fields to Search: Advanced Find
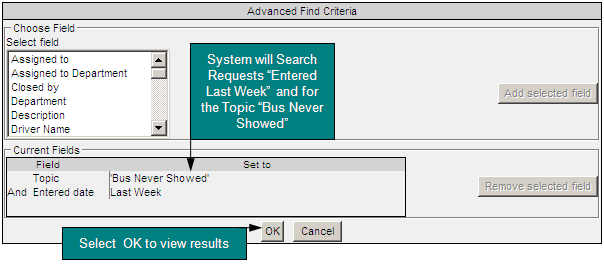
Figure 9 - Search Criteria is Set across Two Fields
To remove a field from the search criteria, select a field in the “Current Fields” section and select the “Remove selected field” button.